

S3 bucket can be configured to host a website with static contents (Html, CSS, and JavaScript + media files).
- Due to the recent changes of how to set permissions to buckets and images, you need to be careful to follow each step.
Static Web Hosting
Configuration
- In the Bucket Properties, enable “Static website hosting“
- Index document: the default document for a bucket’s URL endpoint
- Error document: is loaded when an object is not found.
Access Controls
- Make sure your bucket and files have public access.
- Objects can be read by anonymous users via ACL or bucket policy.
- By default, S3 blocks public access. -> Need to allow the public access to a bucket.
- CloudFront can be added to improve the speed and efficiency of content delivery for global users.
- CORS (Cross-Origin Resource Sharing)
- allows a web application in one domain to reference resources in another domain.
- S3 doesn’t support HTTPS access for website endpoints. If you want to use HTTPS, you can use CloudFront to serve a static website hosted on Amazon S3.
Steps to Configure a Static Website
Please refer to the following URL for the detailed tutorial.
https://docs.aws.amazon.com/AmazonS3/latest/userguide/HostingWebsiteOnS3Setup.html
Here is the concise instruction.
- Step 1: Create a bucket
- Accept all default settings
- ACL Disabled
- Block all public access
- Notice that the public access is disabled.
- Accept all default settings
- Step 2: Configure an index document
- Create index.html file and upload it to the bucket with default settings
- Upload other website content as well
- Step 3: Configure an error document
- Create error.html file and upload it to the bucket with default settings
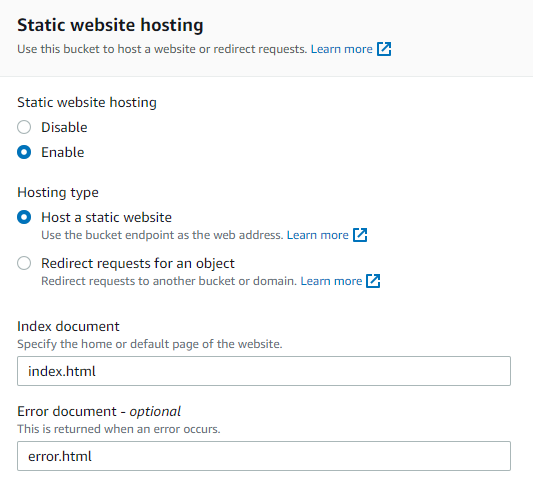
- Step 4: Enable static website hosting
- On the bucket “Properties” tab, enable “Static website hosting.”
- Set the index (default) document and the error document
- Enter “index.html” and “error.html”
- The endpoint, which is different from your bucket address, is the entry point to your website.
- http://{bucket-name}.s3-website-{region}.amazonaws.com

- Step 5: Edit Block Public Access settings
- When you try to access the endpoint, you are getting the “403 Forbidden” error.
- By default, Amazon S3 blocks public access to your account and buckets.
- Allow all public access
- Click the bucket’s “Permissions” tab
- Clear “Block all public access”.
- Your website is still blocked.
- The bucket is public but the files in the bucket are still private.
- Step 6: Add a bucket policy that makes your bucket content publicly available
- To make static pages publicly available, you need to add a bucket policy to grant public read access to your bucket.
- Under Bucket Policy in the “Permissions” tab, add the following policy to grant public read access.
- You can create a permission using the “Policy generator“.
{
    "Version": "2012-10-17",
    "Statement": [
        {
            "Sid": "PublicReadGetObject",
            "Effect": "Allow",
            "Principal": "*",
            "Action": [
                "s3:GetObject"
            ],
            "Resource": [
                "arn:aws:s3:::<Bucket-Name>/*"
            ]
        }
    ]
}
- Step 7: Test your HTTP website endpoint
- Amazon S3 does not support HTTPS access to the website.
- If you want to use HTTPS, you can use Amazon CloudFront to serve a static website hosted on Amazon S3.
Steps to Configure CloudFront with a Static Website
Once you complete the previous tutorial, let’s put the CloudFront in front of your static website. Direct access to the website endpoint will be prohibited.
There are 2 ways to create the CloudFront distribution
- Using OAI (Origin Access Identity) user – legacy
- Using OAC(Origin Access Control) – recommended
Setup CloudFront with OAI (Legacy)
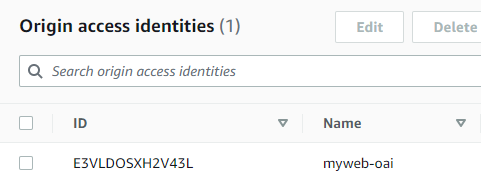
- Step 1: Create OAI in CloudFront (legacy)
- An OAI (Origin Access Identity) is a special CloudFront user that can access an S3 bucket on behalf of website users.
- Step 2: Delete the S3 bucket policy
- In the S3 Bucket Policy, remove public read access to all users
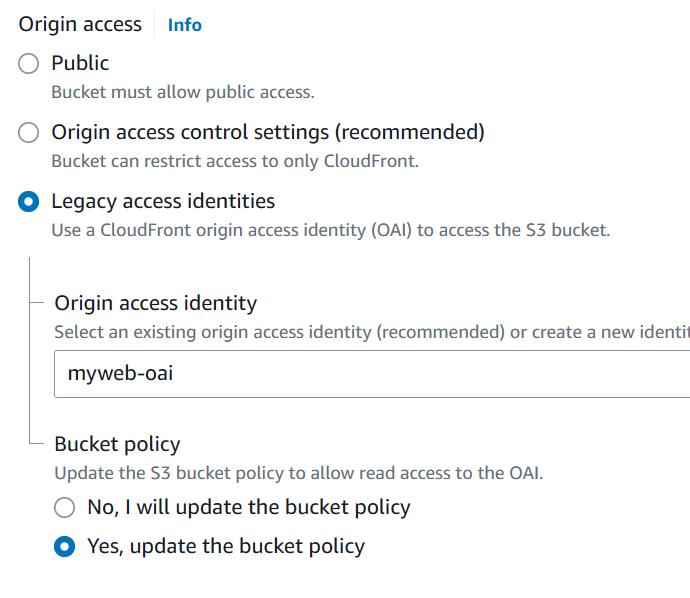
- Step 3: Create a CloudFront distribution with OAI (legacy)
- Set the origin domain – S3
- Set the Origin access to use OAI (legacy)
- You can update the bucket policy with OAI here.
- Set the default root object (index.html) as an entry point
- Optionally you can setup HTTPS

- Step 4: Check the Updated S3 bucket policy
- By checking the option, AWS updates the S3 bucket policy for you.
- It grants the read access to the OAI user using the following policy.
- You can update the bucket policy manually.
{
    "Version": "2008-10-17",
    "Id": "PolicyForCloudFrontPrivateContent",
    "Statement": [
        {
            "Effect": "Allow",
            "Principal": {
                "AWS": "arn:aws:iam::cloudfront:user/CloudFront Origin Access Identity <OAI Id>"
            },
            "Action": "s3:GetObject",
            "Resource": "arn:aws:s3:::<Bucket-Name>/*"
        }
    ]
}
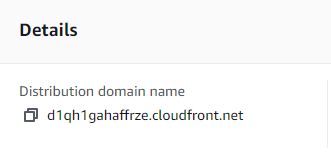
- Step 5: Test the website with a distribution domain name
Setup CloudFront with OAC
Amazon CloudFront launches Origin Access Control (OAC), which replaces OAI.
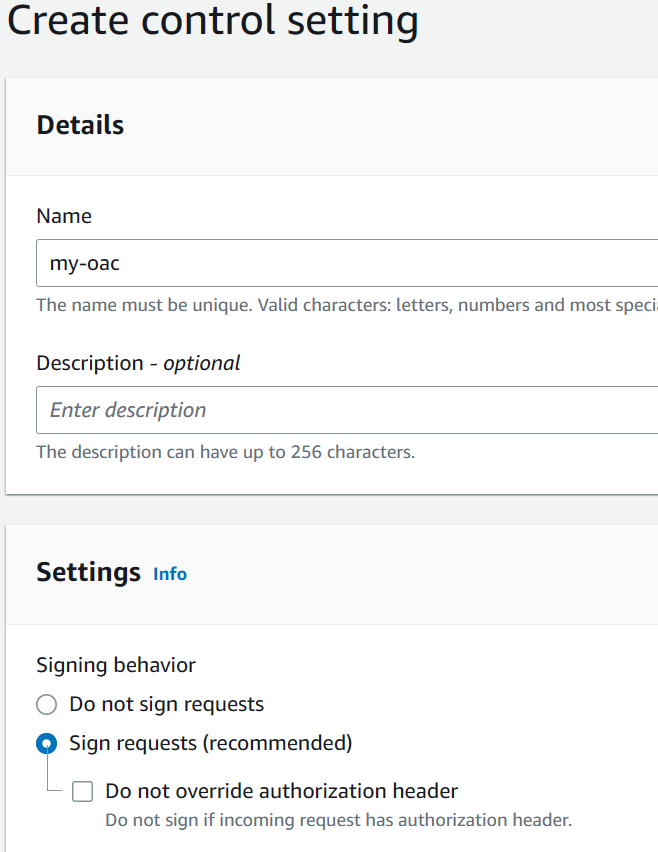
- Step 1: Create Origin Access Control (OAC)
- Step 2: Create a CloudFront distribution with OAC
- Set the origin domain as S3 bucket
- Set the bucket access to use OAC
- Set the default root object as an entry point
- Optionally you can setup HTTPS
- Upon completion, you will get the S3 bucket policy for OAC
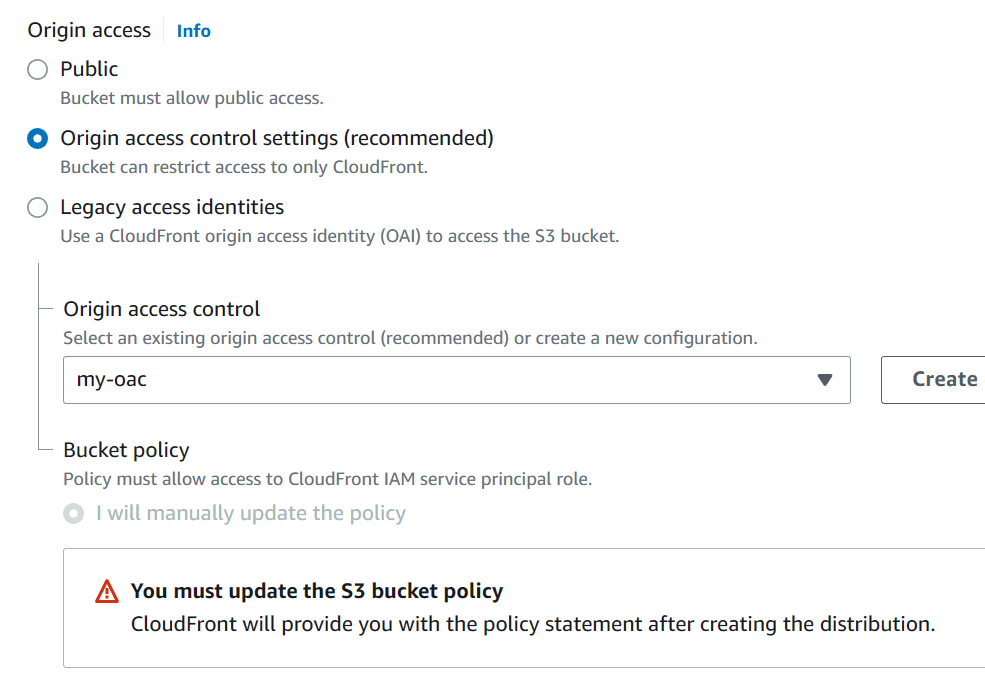
- Step 3: Update the S3 bucket policy
- In the S3 Bucket Policy, replace the bucket policy with the one that CloudFront provided for you
{
    "Version": "2008-10-17",
    "Id": "PolicyForCloudFrontPrivateContent",
    "Statement": [
        {
            "Sid": "AllowCloudFrontServicePrincipal",
            "Effect": "Allow",
            "Principal": {
                "Service": "cloudfront.amazonaws.com"
            },
            "Action": "s3:GetObject",
            "Resource": "arn:aws:s3:::{bucket}/*",
            "Condition": {
                "StringEquals": {
                  "AWS:SourceArn": "{distribution-arn}"
                }
            }
        }
    ]
}
- Step 4: Test the website with a distribution domain name
Setup the Static Website via AWS CLI
# check the bucket
aws s3 ls

# upload files
aws s3 cp index.html s3://my-website-1234/index.html --acl public-read
aws s3 cp error.html s3://my-website-1234/error.html --acl public-read

aws s3 ls s3://my-website-1234 --recursive

# setup the static web site
aws s3 website s3://my-website-1234/ --index-document index.html --error-document error.html

# Setup CloudFront distribution
aws cloudfront create-distribution `
    --origin-domain-name my-website-1234.s3.amazonaws.com `
    --default-root-object index.html

# In the result, You can find the domain name
# or you can check the domain name in the AWS console
